12 Easy Bedroom Wall Decor Ideas for Renters You’ll Love
The best bedroom wall decor ideas for renters solve one problem: how do you make plain white walls feel like home when every nail hole might come out of your deposit? Most rentals come with the same flat paint and a lease that makes you nervous about hanging anything heavier than a calendar.
So the walls stay bare, and the room never quite feels like yours. Rental bedrooms end up looking temporary, even after you’ve lived there for years.
The good news is that you have plenty of low-risk options. Removable hooks, fabric, washi tape, leaning pieces and a few smart hardware choices can give you a finished, personal bedroom that comes down cleanly when you move out.
5 Renter Rules Before You Hang Anything
- Read your lease for any rules about nails, screws, adhesives or painting.
- Test any adhesive on a hidden spot, like inside a closet, before using it on a main wall.
- Clean the wall with rubbing alcohol and let it dry before applying strips or hooks, so they grip properly.
- Respect the weight rating printed on every package, and choose the next size up when in doubt.
- Remove strips by pulling the tab straight down along the wall, slowly, never outward toward you.
How to Read the Wall Blueprint
Every idea below comes with a Wall Blueprint. Room Size shows which rooms it suits, Damage Risk shows how likely it is to leave a mark, Budget Tier gives a rough cost, and Calm Score rates from 1 to 5 how quiet it looks. The Wall Map shows the wall behind your bed from the front, so you can see exactly how high each idea goes.
1. Oversized Fabric Tapestry Hung on Removable Hooks
Room Size
Damage Risk
Low
Budget Tier
$ Under $50
Calm Score
4 out of 5
Soft and warm, and it covers a lot of bare wall at once.
Wall Map: Front View
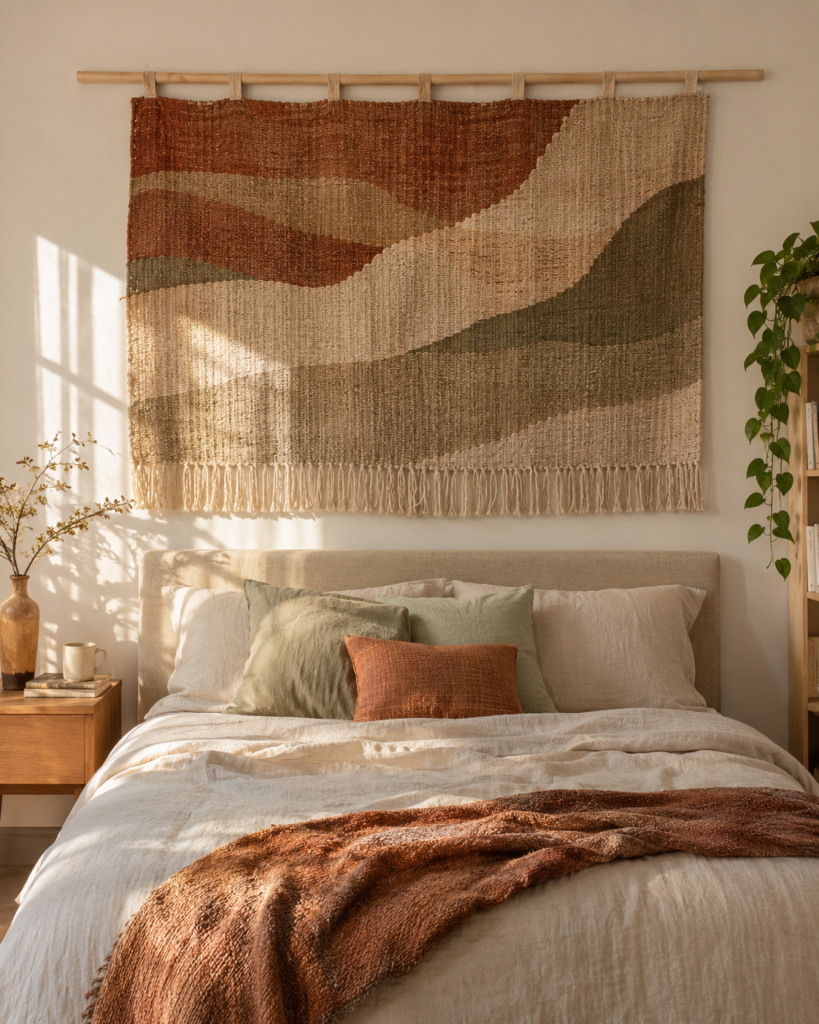
A large fabric tapestry is the fastest way to cover a bare wall with very little risk. A woven cotton or linen piece about 5 feet wide and 3 feet tall behind the bed works like a soft headboard and instantly warms up white rental walls.
Hardware and Damage-Free Mounting
- A lightweight wooden rod or slim dowel slipped through the top hem
- Two removable adhesive hooks rated for the rod and fabric, so check the package
- Clear adhesive dots to keep the bottom corners from curling
Styling and Placement Rules
Center it over the bed and let the bottom edge sit about 6 to 8 inches above the headboard, which leaves a little breathing room below an 8 foot ceiling. Quiet, earthy colors like rust, oat or sage keep the wall calm instead of busy.
Safe Removal Note
Lift the rod off the hooks first. Then pull each hook’s tab slowly straight down along the wall, stretching it until the adhesive lets go.
Stylist Tip: Steam the tapestry before you hang it. Fold lines from the package are the main thing that makes a tapestry look cheap.
2. Lightweight Gallery Wall with Removable Picture-Hanging Strips
Room Size
Damage Risk
Medium
Budget Tier
$$ $50 to $150
Calm Score
3 out of 5
Personal and collected, but many frames give the eye a lot to look at.
Wall Map: Front View
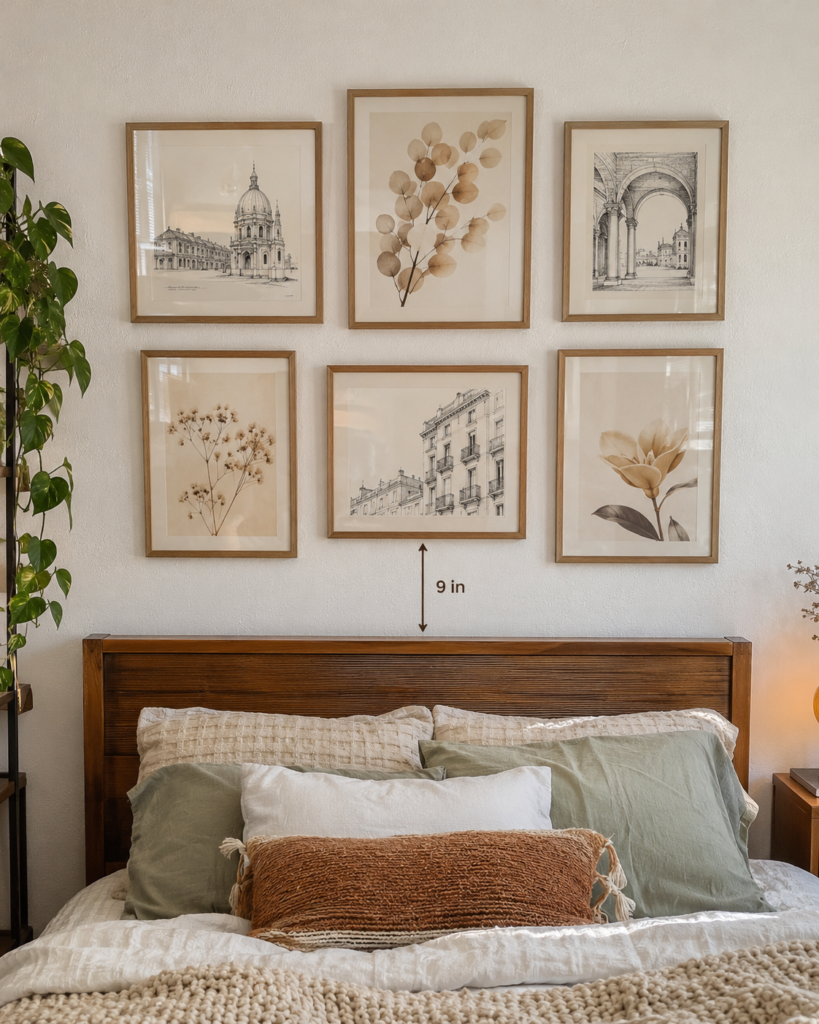
A gallery wall of lightweight frames gives you a curated, collected look without a single nail. Choose frames with acrylic fronts instead of glass, since they weigh less and are safer above a bed.
Hardware and Damage-Free Mounting
- Removable picture-hanging strips in a size rated above each frame’s weight
- Lightweight frames with acrylic glazing
- A level and painter’s tape for planning the layout
Styling and Placement Rules
Keep the whole group about two thirds the width of the bed, and start the lowest frames 8 to 10 inches above the headboard. Leave about 2 to 3 inches between frames so the arrangement reads as one unit.
Safe Removal Note
Lift each frame upward off its strip, then pull every strip tab slowly straight down along the wall. Never yank strips outward toward you, because that’s what peels paint.
Stylist Tip: Trace each frame on kraft paper, tape the paper shapes to the wall, and live with the layout for a day before you stick anything up.
3. Plug-In Swing-Arm Wall Sconces Beside the Bed
Room Size
Damage Risk
Medium
Budget Tier
$$ $50 to $150
Calm Score
5 out of 5
Soft, warm light with nothing taking up nightstand space.
Wall Map: Front View
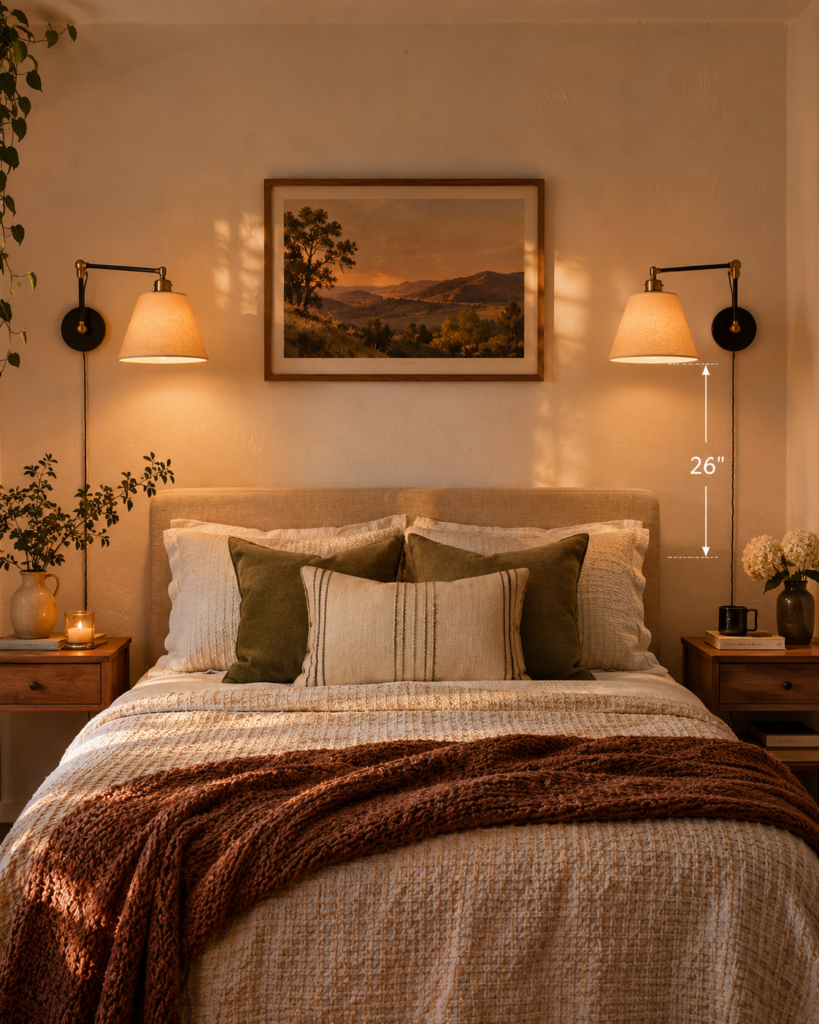
Plug-in wall sconces on each side of the bed add soft light and a built-in, custom look. They also free up nightstand space you’d otherwise lose to lamps.
Hardware and Damage-Free Mounting
- Plug-in sconces with a fabric cord and an inline switch
- Two small screws per sconce, or the anchors supplied in the box
- Paintable cord covers to run the cord down to the outlet
Styling and Placement Rules
Mount them so the bottom of each shade sits about 24 to 30 inches above the mattress and roughly 6 inches outside the edges of the headboard. Warm 2700K bulbs give a soft evening glow.
Safe Removal Note
Unscrew the bracket, fill each small hole with a dab of spackle, smooth it with a putty knife and touch it up with matching paint. Many leases treat a few small screw holes as normal wear, but check yours first.
Stylist Tip: Choose swing-arm sconces so you can pull the light closer for reading and push it back flat against the wall when you’re done.
4. Peel-and-Stick Removable Wallpaper Accent Wall
Room Size
Damage Risk
Medium
Budget Tier
$$ $50 to $150
Calm Score
3 out of 5
A full wall of pattern adds a lot of energy, so keep the design subtle.
Wall Map: Whole Wall
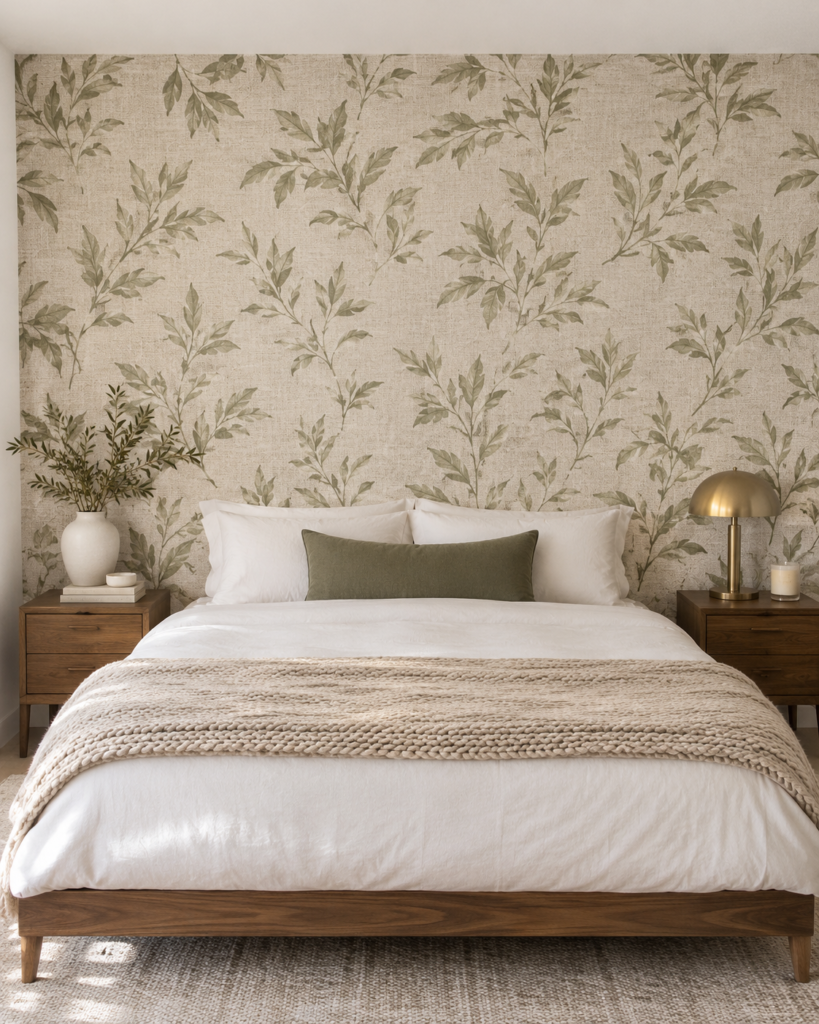
Peel-and-stick wallpaper on the wall behind the bed gives you a full accent wall that can come down when you move out. Subtle designs like a linen texture, faded botanicals or soft stripes look the most expensive.
Hardware and Damage-Free Mounting
- Peel-and-stick wallpaper rolls, plus a few extra feet for matching the pattern
- A plastic smoothing tool and a sharp utility knife
- A level or laser line for the first panel
Styling and Placement Rules
Hang the first panel perfectly straight in the center of the wall and work outward from there. Stick to one wall only so the room still feels calm.
Safe Removal Note
Start at a top corner and peel slowly at a low angle, pulling the panel back on itself instead of out toward you. A hair dryer on low softens stubborn spots.
Stylist Tip: Peel-and-stick works best on smooth walls with satin or eggshell paint. On flat or freshly painted walls it can lift paint, so wait at least 3 to 4 weeks after any repainting and test a hidden spot first.
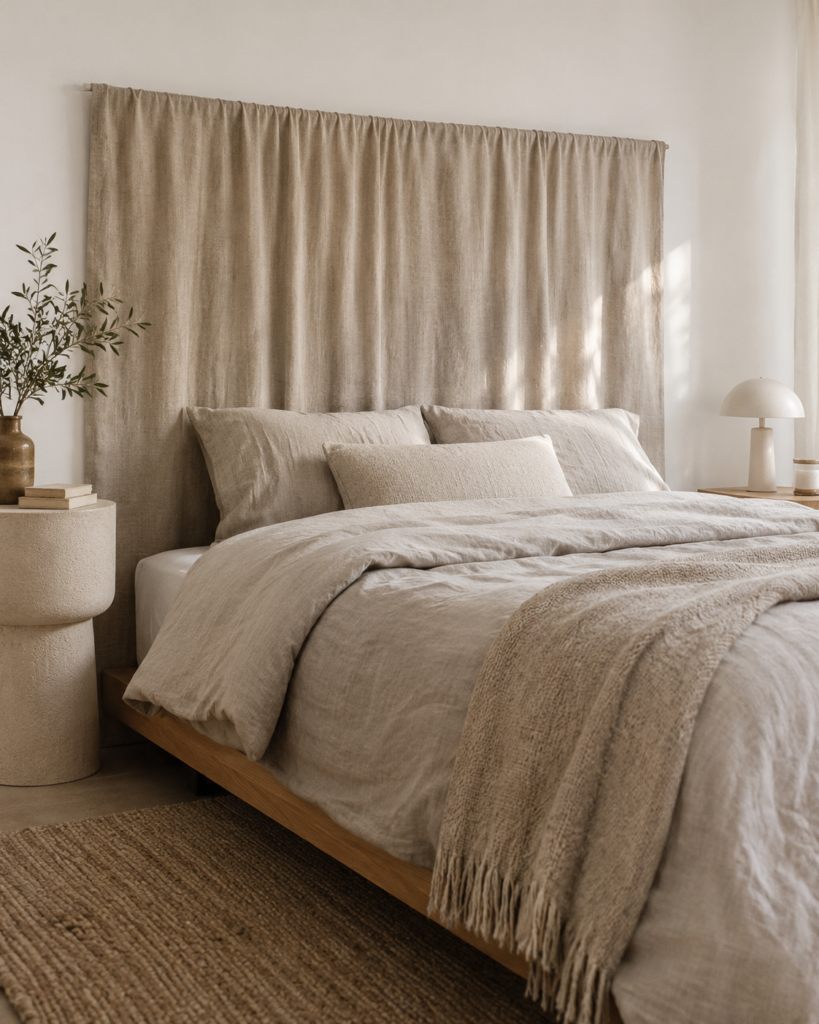
5. Fabric Panel Headboard Alternative
Room Size
Damage Risk
Low
Budget Tier
$ Under $50
Calm Score
5 out of 5
Soft, simple and calm, and it makes the bed look finished.
Wall Map: Front View
No headboard? Hang a fabric panel behind the bed to create one. A linen curtain on a lightweight rod or a fabric-wrapped panel makes the bed look finished right away.
Hardware and Damage-Free Mounting
- A tension rod fitted into a wall alcove, or a lightweight curtain rod on two removable hooks
- One linen or velvet curtain panel at least as wide as the bed
- Or a foam board wrapped in fabric that simply leans behind the bed
Styling and Placement Rules
Let the fabric start about 12 to 18 inches above the top of the mattress and fall down behind the bed. A color one or two shades deeper than your walls creates a soft frame.
Safe Removal Note
Lift the rod off its hooks and remove each hook by pulling the tab straight down along the wall. A leaning fabric panel just slides out with no wall contact at all.
Stylist Tip: Push the bed snugly against the fabric. That light pressure keeps it smooth without any extra mounting.
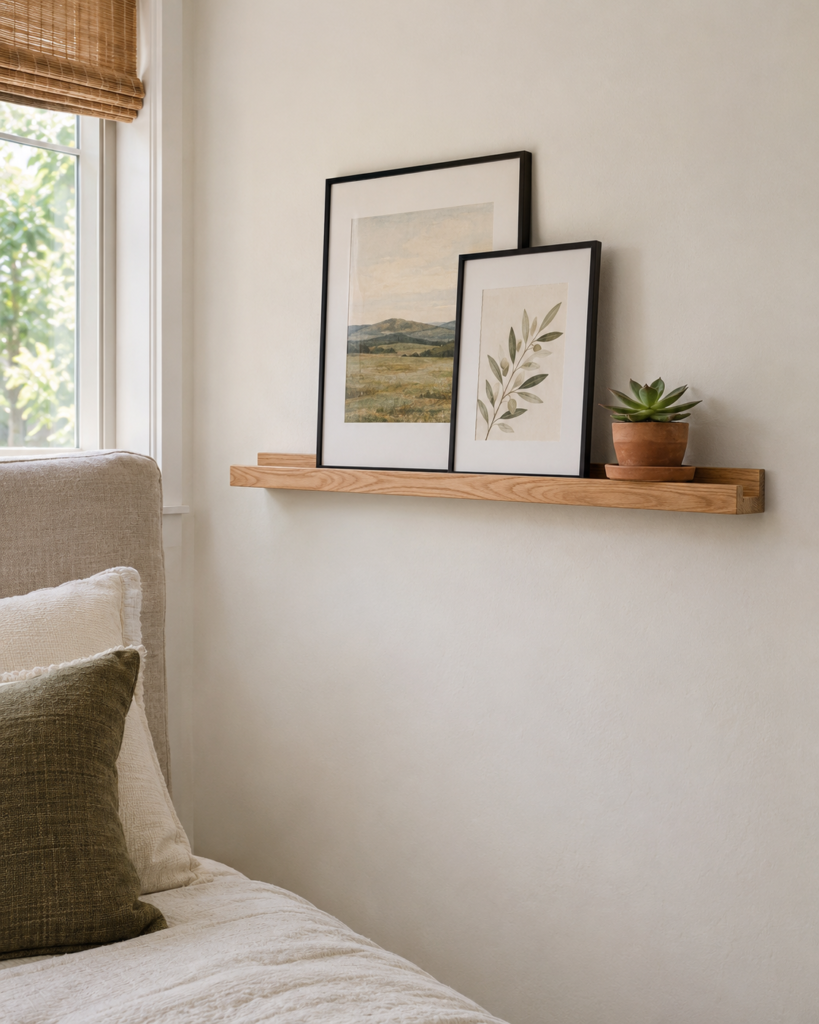
6. Single Picture Ledge on One Side Wall
Room Size
Damage Risk
Medium
Budget Tier
$ Under $50
Calm Score
4 out of 5
Easy to restyle, with just a few pieces on display.
Wall Map: Front View
A single picture ledge on one side of the bed lets you lean art, books and small plants, then swap them whenever you like without making new holes.
Hardware and Damage-Free Mounting
- A slim wood picture ledge about 2 to 3 feet long
- Small screws and drywall anchors, since most ledges need screws to hold safely
- Museum putty to stop leaning frames from sliding
Styling and Placement Rules
Hang it on the side wall at about eye level when you’re standing, roughly 55 to 60 inches from the floor. Layer two or three pieces of different heights and let them overlap slightly.
Safe Removal Note
Remove the screws and anchors, fill the holes with spackle, sand them smooth and touch up the paint.
Stylist Tip: Keep the ledge beside the bed, not above it. Leaning frames are light, but they can still slide off if the wall gets bumped at night.
7. Full-Length Leaning Mirror

Room Size
Damage Risk
Low
Budget Tier
$$ $50 to $150
Calm Score
4 out of 5
Brightens the room with no holes, though it takes a little floor space.
Wall Map: Front View
A full-length leaning mirror bounces light around a small bedroom without a single hole for hanging it. It’s one of the most renter-friendly upgrades there is.
Hardware and Damage-Free Mounting
- A floor mirror at least 60 inches tall with a sturdy frame
- An anti-tip strap or furniture anchor kit
- Felt pads or a rubber grip strip under the base
Styling and Placement Rules
Lean it against the side wall with the base pulled out about 4 to 6 inches. Place it where it reflects a window or lamp to double the light.
Safe Removal Note
The mirror simply lifts away. An anti-tip strap is usually held by one small screw, which is easy to patch with a dab of spackle.
Stylist Tip: Even a leaning mirror can tip. Always use an anti-tip strap, especially if you have kids or pets.
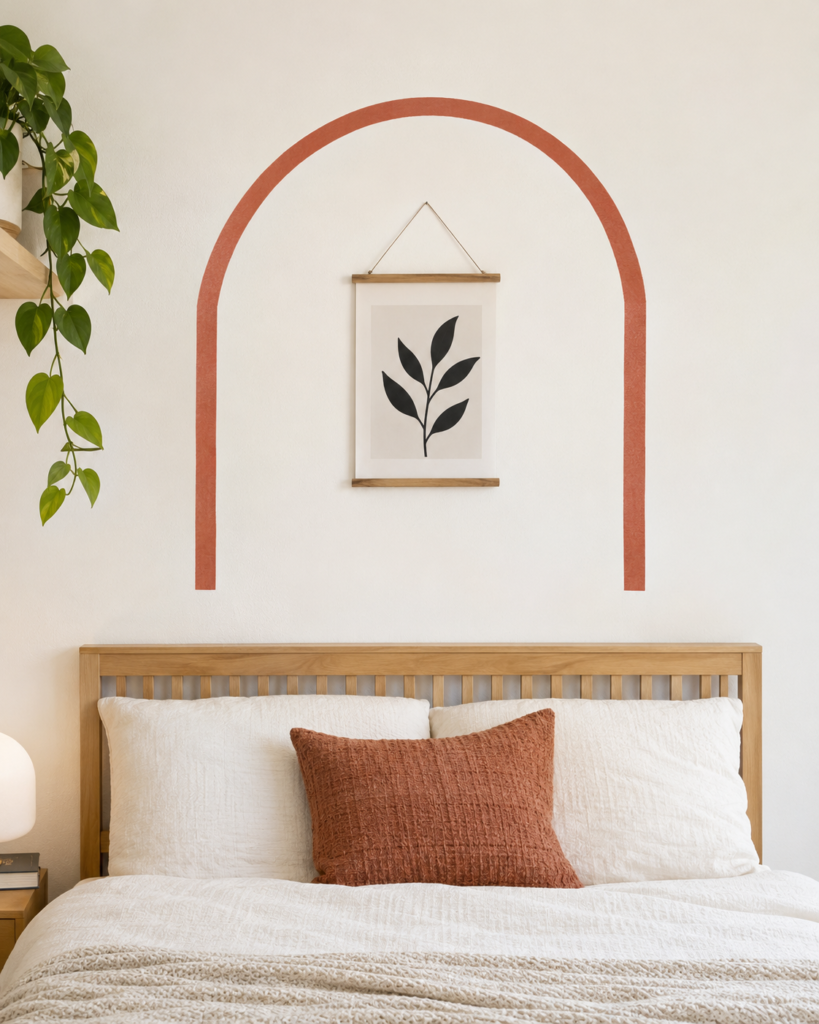
8. Washi Tape Arch or Frame Above the Bed
Room Size
Damage Risk
Low
Budget Tier
$ Under $50
Calm Score
4 out of 5
One clean shape in a soft color stays light and quiet.
Wall Map: Front View
Washi tape turns a plain wall into a design in one afternoon. Use it to outline a large arch, a simple frame or a neat grid above the bed.
Hardware and Damage-Free Mounting
- Matte washi tape in one or two colors, about 0.6 to 1 inch wide
- A pencil, a level and a measuring tape
- A small craft knife for clean corners
Styling and Placement Rules
Sketch the shape lightly in pencil first, keeping the bottom of the design about 6 to 10 inches above the headboard. One clean shape in a soft color looks more styled than lots of thin lines.
Safe Removal Note
Peel washi tape slowly at a sharp angle, folding it back against itself. It’s made to come off easily, but old or sun-baked tape can leave residue, so refresh it every few months.
Stylist Tip: Hang a lightweight print in the middle of a washi tape arch. The tape becomes the frame, and the print becomes the focal point.
9. Macramé or Woven Wall Hanging Placed High

Room Size
Damage Risk
Low
Budget Tier
$ Under $50
Calm Score
4 out of 5
Soft texture up high that draws the eye without crowding the bed.
Wall Map: Front View
A macramé or woven wall hanging adds soft texture and a handmade feel. It’s light enough to hang high on the wall, where it draws the eye up and makes the ceiling feel taller.
Hardware and Damage-Free Mounting
- A macramé or woven piece on a wooden dowel
- One or two removable adhesive hooks rated for its weight
- A small level to keep the dowel straight
Styling and Placement Rules
Hang it in the upper center of the wall, with the bottom of the fringe ending about 10 to 14 inches above the headboard. Natural cotton, jute or wool tones keep it calm.
Safe Removal Note
Lift the dowel off and remove each hook by pulling its tab slowly straight down along the wall.
Stylist Tip: Comb the fringe with a wide-tooth comb and trim it straight with fabric scissors. A neat fringe makes a handmade piece look polished.
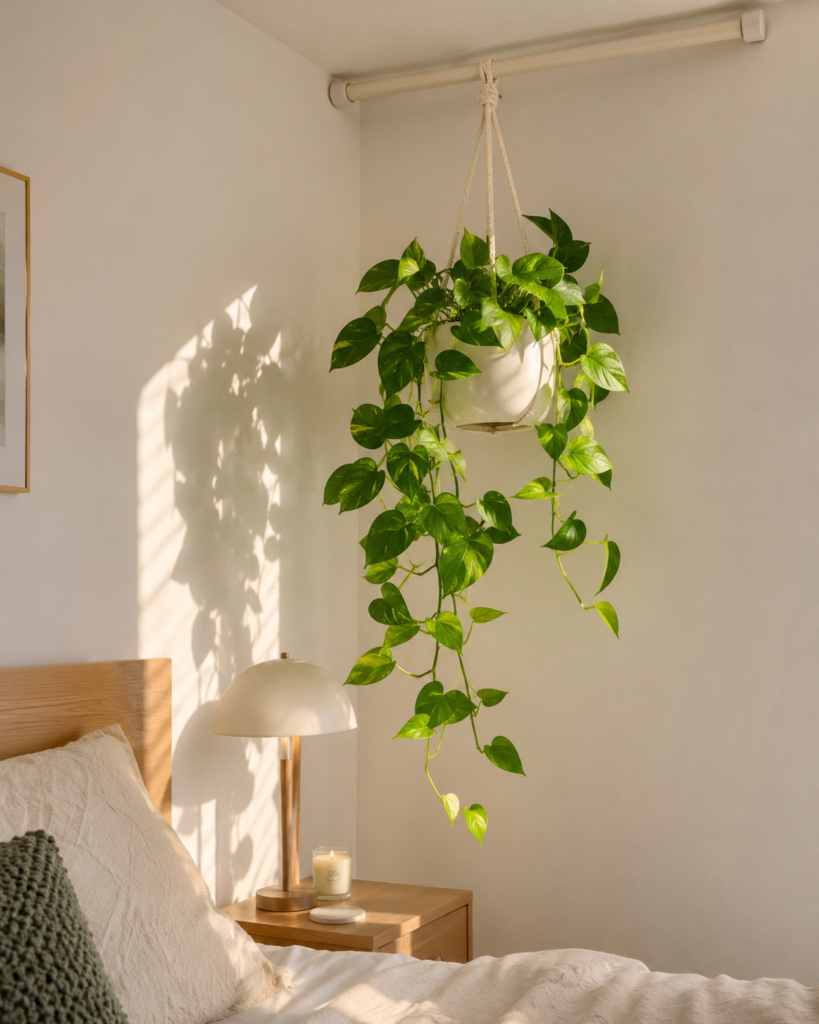
10. Hanging Planters in an Upper Corner
Room Size
Damage Risk
Low
Budget Tier
$ Under $50
Calm Score
4 out of 5
Fresh greenery up high, as long as you keep it to one or two pots.
Wall Map: Front View
Hanging planters bring greenery up high and keep it off your nightstand. Trailing plants like pothos look especially soft spilling over the edge.
Hardware and Damage-Free Mounting
- A floor-to-ceiling tension pole with plant hooks, which holds by pressure instead of screws
- Or one ceiling hook, only if your lease allows it
- Lightweight planters with built-in saucers, or faux trailing plants if your room gets little light
Styling and Placement Rules
Set the tension pole in an upper corner beside the bed, ideally the corner that gets the most daylight if you’re using real plants. Keep the bottom of each pot at least 6 feet from the floor so nobody bumps into it.
Safe Removal Note
A tension pole simply twists loose and comes down without leaving a mark. A ceiling hook leaves one small hole that fills easily with spackle.
Stylist Tip: Water real plants in the sink and let them drain completely before hanging them back up, so water never drips down the wall.
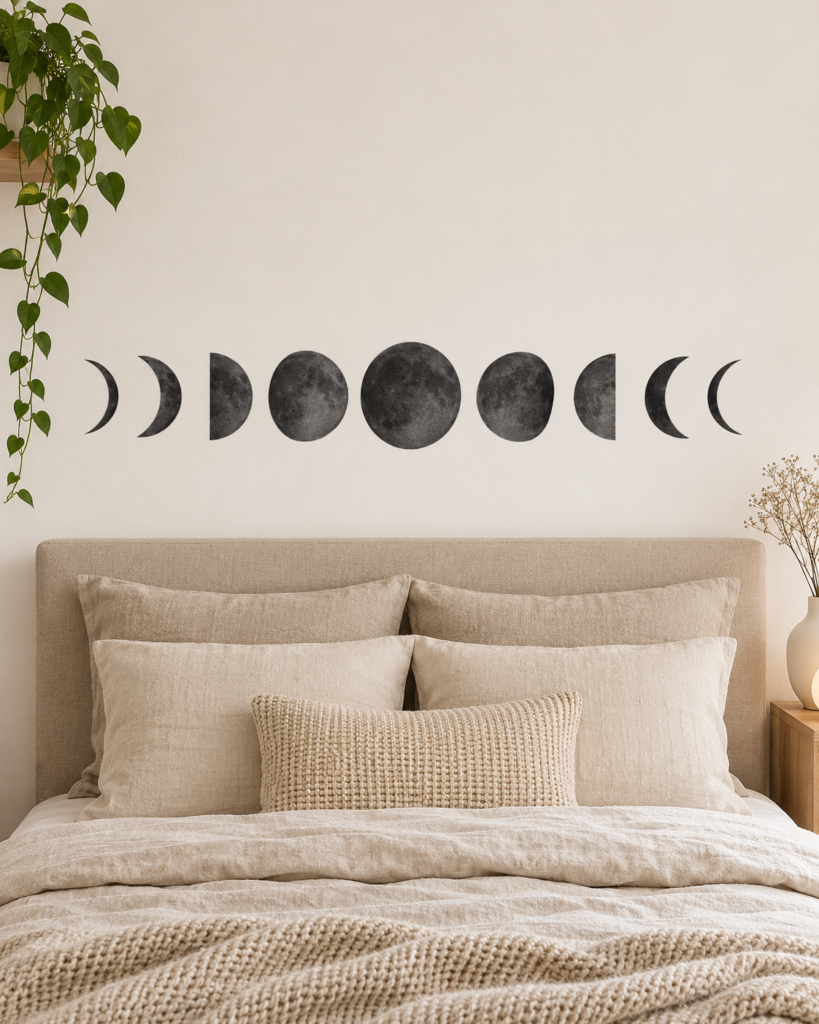
11. Removable Wall Decals Above the Headboard
Room Size
Damage Risk
Low
Budget Tier
$ Under $50
Calm Score
4 out of 5
A small custom detail that stays calm if you keep it to one motif.
Wall Map: Front View
Removable wall decals in simple shapes, like moon phases, botanical sprigs or a soft painted-look arch, add a custom detail with almost no commitment.
Hardware and Damage-Free Mounting
- Matte vinyl or fabric decals clearly labeled removable
- A plastic smoothing card
- A level and painter’s tape for lining them up
Styling and Placement Rules
Keep the design compact and centered above the bed, about 8 to 12 inches above the headboard. One clear motif in a soft color looks more grown-up than a busy scatter.
Safe Removal Note
Warm each decal with a hair dryer on low for a few seconds, then peel it back slowly at a low angle.
Stylist Tip: Fabric decals are often gentler on paint than glossy vinyl, and many can be repositioned if you change your mind.
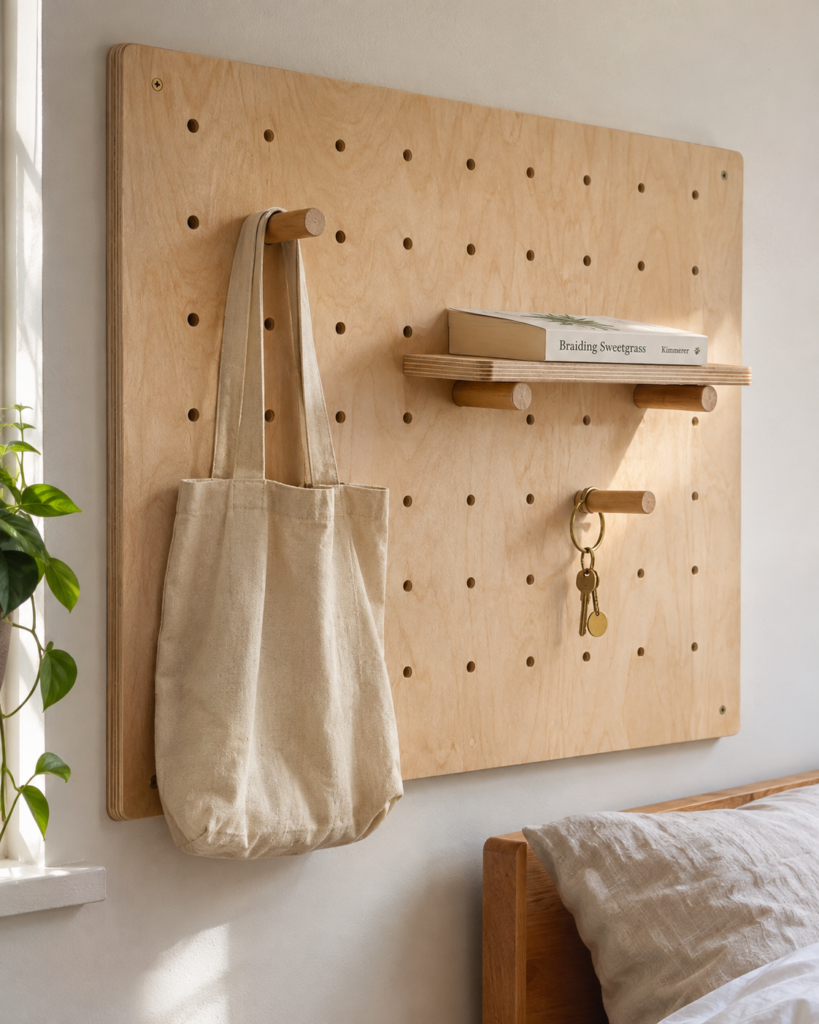
12. Wooden Pegboard Wall on One Side
Room Size
Damage Risk
Medium
Budget Tier
$ Under $50
Calm Score
3 out of 5
Useful, but everything hanging on it is always on show.
Wall Map: Front View
A wooden pegboard on one side wall gives you storage and decor in one. Hang a bag, a small shelf, a plant or tomorrow’s outfit, and rearrange it whenever you like.
Hardware and Damage-Free Mounting
- A birch or pine pegboard panel with wooden pegs
- Screws and drywall anchors rated for what you plan to hang, since a loaded pegboard is too heavy for adhesive
- Spacers so the board sits slightly off the wall
Styling and Placement Rules
Place it on the side wall, not above the bed, with its center at about eye level. Leave some pegs empty so it looks styled instead of overloaded.
Safe Removal Note
Remove the screws and anchors, then fill and sand each hole before touching up the paint.
Stylist Tip: Paint the pegboard the same color as your wall for a quiet look, or leave it natural wood for warm contrast.
Bedroom Wall Decor Ideas for Renters at a Glance
| Idea | Hardware Needed | Wall Placement | Damage Risk | Calm Score |
|---|---|---|---|---|
| 1. Oversized Fabric Tapestry Hung on Removable Hooks | Removable hooks and a dowel | Above headboard and upper center | Low | 4 out of 5 |
| 2. Lightweight Gallery Wall with Removable Picture-Hanging Strips | Picture-hanging strips | Above headboard | Medium | 3 out of 5 |
| 3. Plug-In Swing-Arm Wall Sconces Beside the Bed | Small screws and cord covers | Both side walls | Medium | 5 out of 5 |
| 4. Peel-and-Stick Removable Wallpaper Accent Wall | Peel-and-stick wallpaper | Whole wall | Medium | 3 out of 5 |
| 5. Fabric Panel Headboard Alternative | Tension rod or removable hooks | Above headboard and behind the bed | Low | 5 out of 5 |
| 6. Single Picture Ledge on One Side Wall | Small screws and anchors | One side wall | Medium | 4 out of 5 |
| 7. Full-Length Leaning Mirror | Anti-tip strap and felt pads | Side wall, leaning on the floor | Low | 4 out of 5 |
| 8. Washi Tape Arch or Frame Above the Bed | Washi tape | Above headboard | Low | 4 out of 5 |
| 9. Macramé or Woven Wall Hanging Placed High | Removable hooks | Upper center | Low | 4 out of 5 |
| 10. Hanging Planters in an Upper Corner | Tension pole or one ceiling hook | Upper wall corner | Low | 4 out of 5 |
| 11. Removable Wall Decals Above the Headboard | Removable decals | Above headboard | Low | 4 out of 5 |
| 12. Wooden Pegboard Wall on One Side | Screws and anchors | One side wall | Medium | 3 out of 5 |
The best bedroom wall decor ideas for renters make the room feel like yours without making move-out day stressful. Start with one low-risk piece, like a tapestry or a leaning mirror, test your adhesive on a hidden spot, and build from there one wall at a time. For more cozy bedroom inspiration, browse Comfy Home Decors.
